Here are annotated images of the circuit boards to help with assembly. Click on them to get to a giganto version.
Main board:
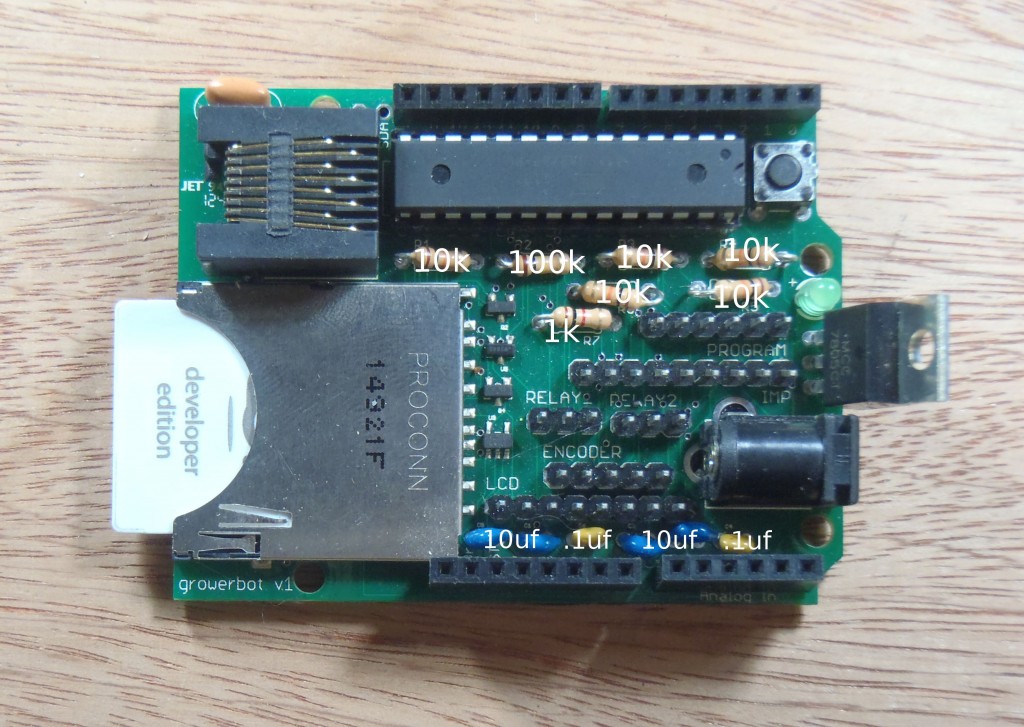
R2 is 10k, R7 is 1k, and all other resistors are 10k.
C4 and C6 are .1 uF, and all other capacitors are 10uF.
Soil probe:
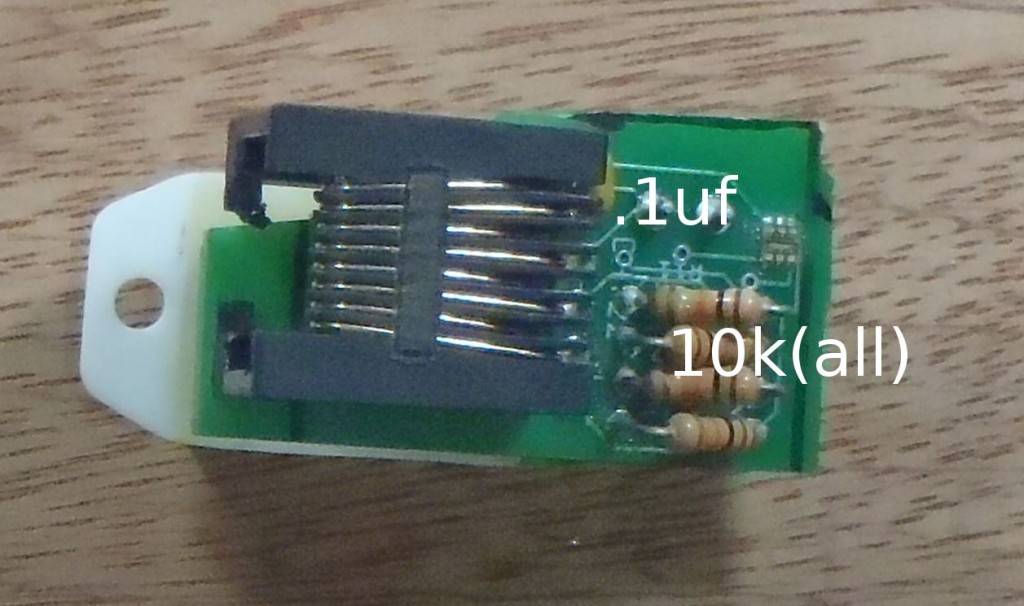
The capacitor is .1 uF, and all resistors are 10k.
Encoder: R1 is 10k.
Please comment with any other questions on getting started with assembly; thanks for your patience!
Hi Luke,
I did not get how to upload arduino sketch on growerbot since i do not see any serial port.
It do not seem a good solution to swap ATMEGA328 from a arduino board to growerbot,
I see a group of pins “program”, do I need them to attach a serial and upload a sketch?
I would like to have an annotated photo of pin usage
I do not have an electric imp on growerbot
When will be ready a kit like you old system?
Where can I get a growerbot?
I dont see any info on purchasing parts.
Hi Zippy, I just added a buy now section. Thanks!
The sensor doesn’t seem like it’d last outside very long. Is this an indoor only system?
hi dan,
it’s definitely not a *years* outside kind of setup now, but the sensor is robust enough to leave out for weeks at a time. be sure to protect the main body of the growerbot from water…
thanks,
luke
I’m a bit confused as to the orientation of the LCD display and connecting board…do you have any clear pics about how they all fit together? I think I messed up on my orientation…thanks.
Maybe there’s some documentation out there that I missed?
Hi George,
Check out the video and discussion here: https://www.growerbot.com/2013/02/03/growerbot-kit-assembly-videos/ . If that doesn’t clear things up, let me know and I’ll take some more photos.
Thanks,
Luke
I get
avrdude: Yikes! Invalid device signature.
Double check connections and try again, or use -F to override
this check.
When trying to bootload the chip. I’ve tried modifying the avrdude and nothing. Any advice?
Hi Gabriel,
Have you tried programming the chip in a normal arduino? If this still doesn’t work, let me know and I’ll send you a preprogrammed replacement.
-Luke
Hey Luke-
Thanks for the suggestion – was finally able to try and I still get:
avrdude: stk500_recv(): programmer is not responding
Would you mind sending me a chip – so sorry.
Gabriel Walsh
237000 Bennett Chase Dr
Clarksburg, MD 20871
Hi Luke- Were you able to send this replacement ? Thanks!
Hi Gabriel,
I just mailed 2 replacements, to make up for the delay:)
Thanks for your patience, and please let me know when you get it working!
-Luke
Thank you so very much!
Hi Luke, finally only now coming up for air to resume assembly, and it looks like I soldered the entire LCD assembly exactly opposite to how I should have. Very hard to follow your video and extract details on the LCD board — a simple still picture would be worth a thousand videos! (or is it a picture being worth a thousand words?:-)). I have attempted to de-solder everything, but it’s a daunting task with the equipment I have on hand (solder wick). Probably best that I buy a new LCD board and LCD from you, if you can make those available to me separately….if so, advise on cost including USPS to Canada…thanks
Hi George,
I’d be happy to send you a replacement. If you take and post pictures of the lcd assembly process, I’ll cover the cost. Same address as for the paypal order, right? Let me know if you need more detail to assemble the lcd.
Thanks,
Luke
Hi Luke, That would be great, sure, happy to take some pics of the (correct) assembly process. I assembled with the silk screen of the lcd mount board facing the same way as the LCD. Much appreciated, and yes, same shipping address as my PayPal order.
cheers,
George
Did those pictures ever get posted? I’m about to do this step and don’t want to screw up
Here you go! https://www.growerbot.com/2014/05/23/wiring-lcd/
Apologies for delay: I’ve been traveling pretty extensively, sourcing parts and finding factories for upcoming versions of growerbot…
Thanks for posting this. I’ve put together a basic board and was surprised to find the GND terminal of the 7805 is connected to the center barrel power pin. Any idea why the power was done this way ?
hi lyncastic,
the most price-performance effective power supplies i found had center ground. if you have the opposite, you can of course just cut and reverse wires anywhere on the cord…
thanks,
luke
Hey Luke,
I was following your video instructions for programming the growerbot. I got the blink program to work. I don’t have an FTDI Cable, so I was going to upload the gbot1219.ino file as I did with the blink program.
Open gbot1219.ino
File → Upload Using Programmer
Then I get an error as follows…
gbot1219:40: error: ‘TSL2561’ does not name a type
gbot1219:70: error: ‘DHT’ does not name a type
gbot1219.ino: In function ‘void setup()’:
gbot1219:137: error: ‘tsl’ was not declared in this scope
gbot1219:137: error: ‘TSL2561_GAIN_16X’ was not declared in this scope
gbot1219:138: error: ‘TSL2561_INTEGRATIONTIME_13MS’ was not declared in this scope
gbot1219:142: error: ‘dht’ was not declared in this scope
gbot1219:158: error: ‘Alarm’ was not declared in this scope
gbot1219.ino: In function ‘void loop()’:
gbot1219:175: error: ‘Alarm’ was not declared in this scope
gbot1219.ino: In function ‘void light()’:
gbot1219:425: error: ‘tsl’ was not declared in this scope
gbot1219.ino: In function ‘void temphum()’:
gbot1219:436: error: ‘dht’ was not declared in this scope
gbot1219.ino: In function ‘void relayCheck()’:
gbot1219:464: error: ‘now’ was not declared in this scope
I’m only basically familiar with programming an Arduino. What do I need to do to fix these errors?
Thanks!
Hi Michael,
It looks like you haven’t added the correct libraries to your arduino folder for using the light sensor, time, and humidity. Here are the libraries you need:
Thanks,
Luke
Hi, I found the answer from Luke’s post elsewhere in the forum.
The Libraries are:
Time Library http://www.arduino.cc/playground/uploads/Code/Time.zip
Adafruits Lux sensor library https://github.com/adafruit/TSL2561-Arduino-Library
Adafruits DHT sensor library https://github.com/adafruit/DHT-sensor-library
Hi Luke
I am thinking of using the growbot for a window farm project I am directing for a group of high school students.
please see this link
http://lulacqueens.org/portfolio_item/windowfarm/